Zaccaria number 3
Posted: 25 April 2014 Filed under: General, Time Machine | Tags: pinball, zaccaria Leave a comment »
I was weak last week…
While looking through the wanted adds on marktplaats.nl I saw a Time Machine for sale. When I looked up the sellers contacts, I noticed he lived about 3 km away. So I called him, just to go have a look and meet another enthusiast.
The Time Machine was set up and working. It needed a bit of cleaning, fixing the woodwork and replacing of a few lamps, but everything was working, playfield was ok, ramps and plastics were in order.
So we talked a bit and he mentioned that he had five Zaccaria’s in total. A Clown, which was set up next to the Time Machine, already sold and waiting for pickup; A Soccer Kings of which I could see the backbox, but the body was hidden behind other pinball machines and other stuff; An Earth Wind Fire, which he was going to get ready for sale next; And a Robot, which I wanted to see. I’ve only seen this machine once before and I would like to have one. After some digging and moving stuff around, the Robot was uncovered, set up and everything. He switched it on and it played, but without sound. Could be a minor issue, could be something bigger (see this post).
By seeing both the Time Machine and the Robot, I was already thinking where I could put them in my apartment, so I offered a price for both. Unfortunately he wasn’t sure about letting go of the Robot. You don’t see it very often and he likes the theme, just like I do. Too bad.
So I went home…
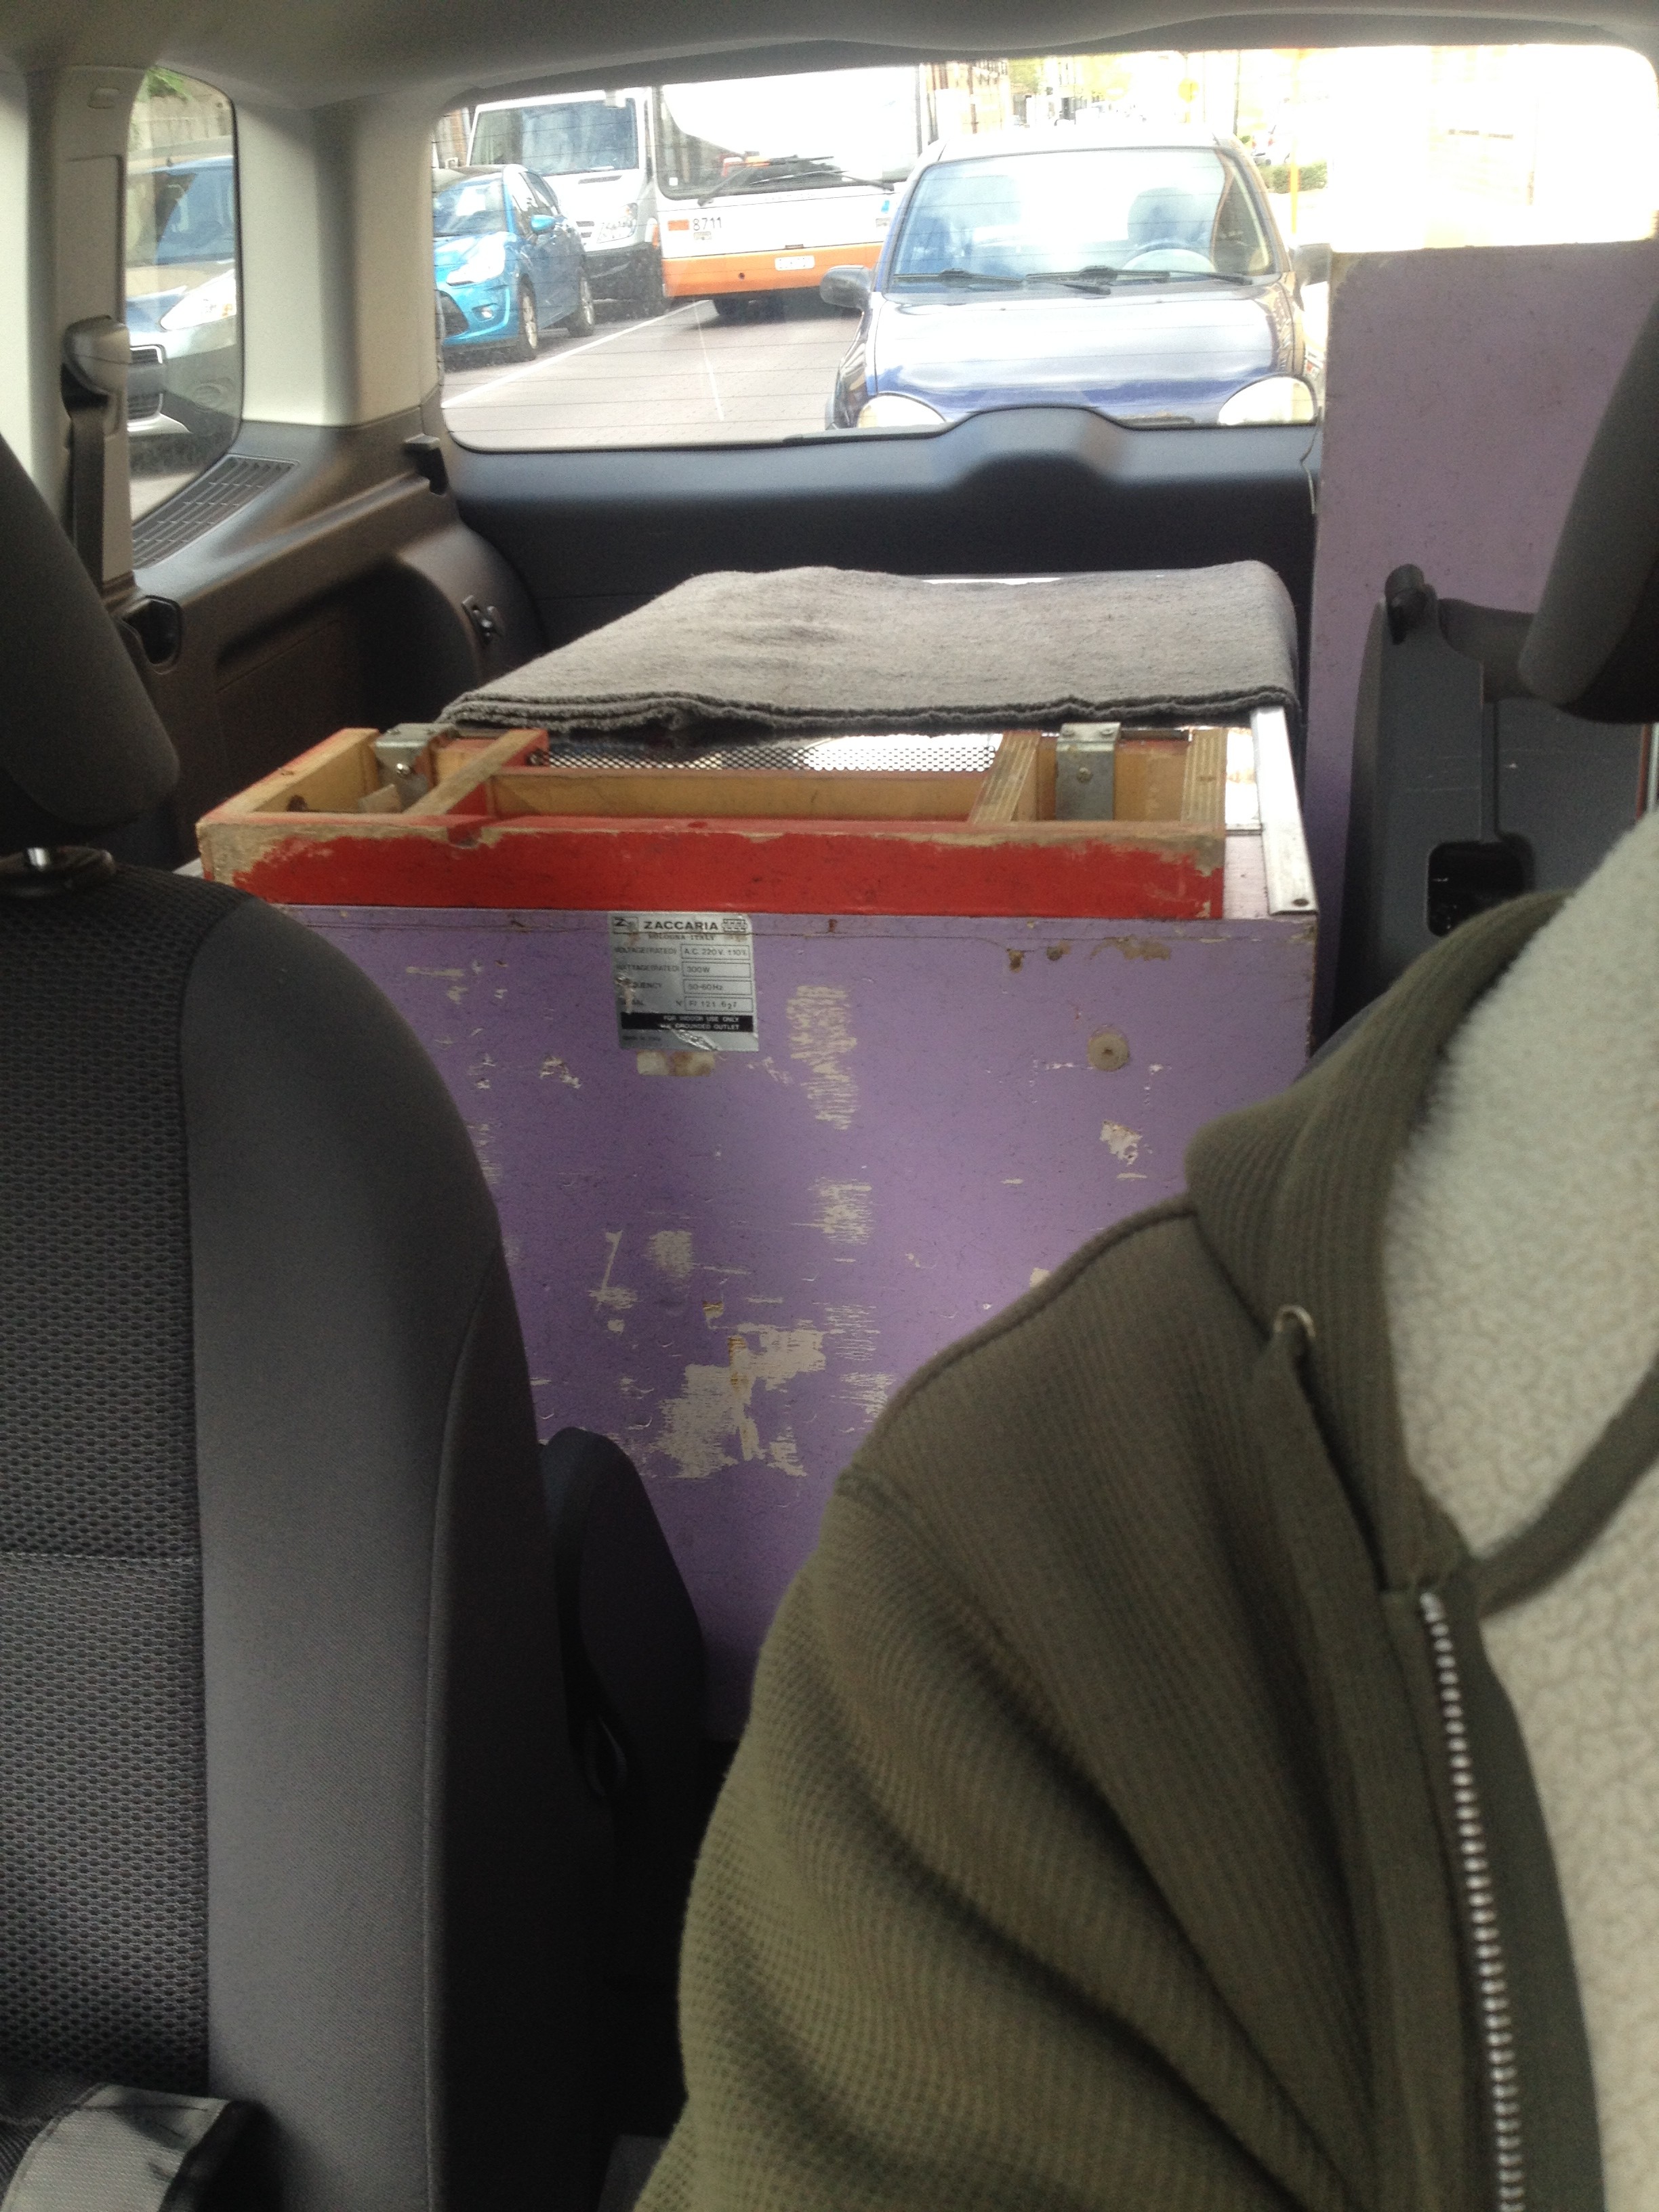
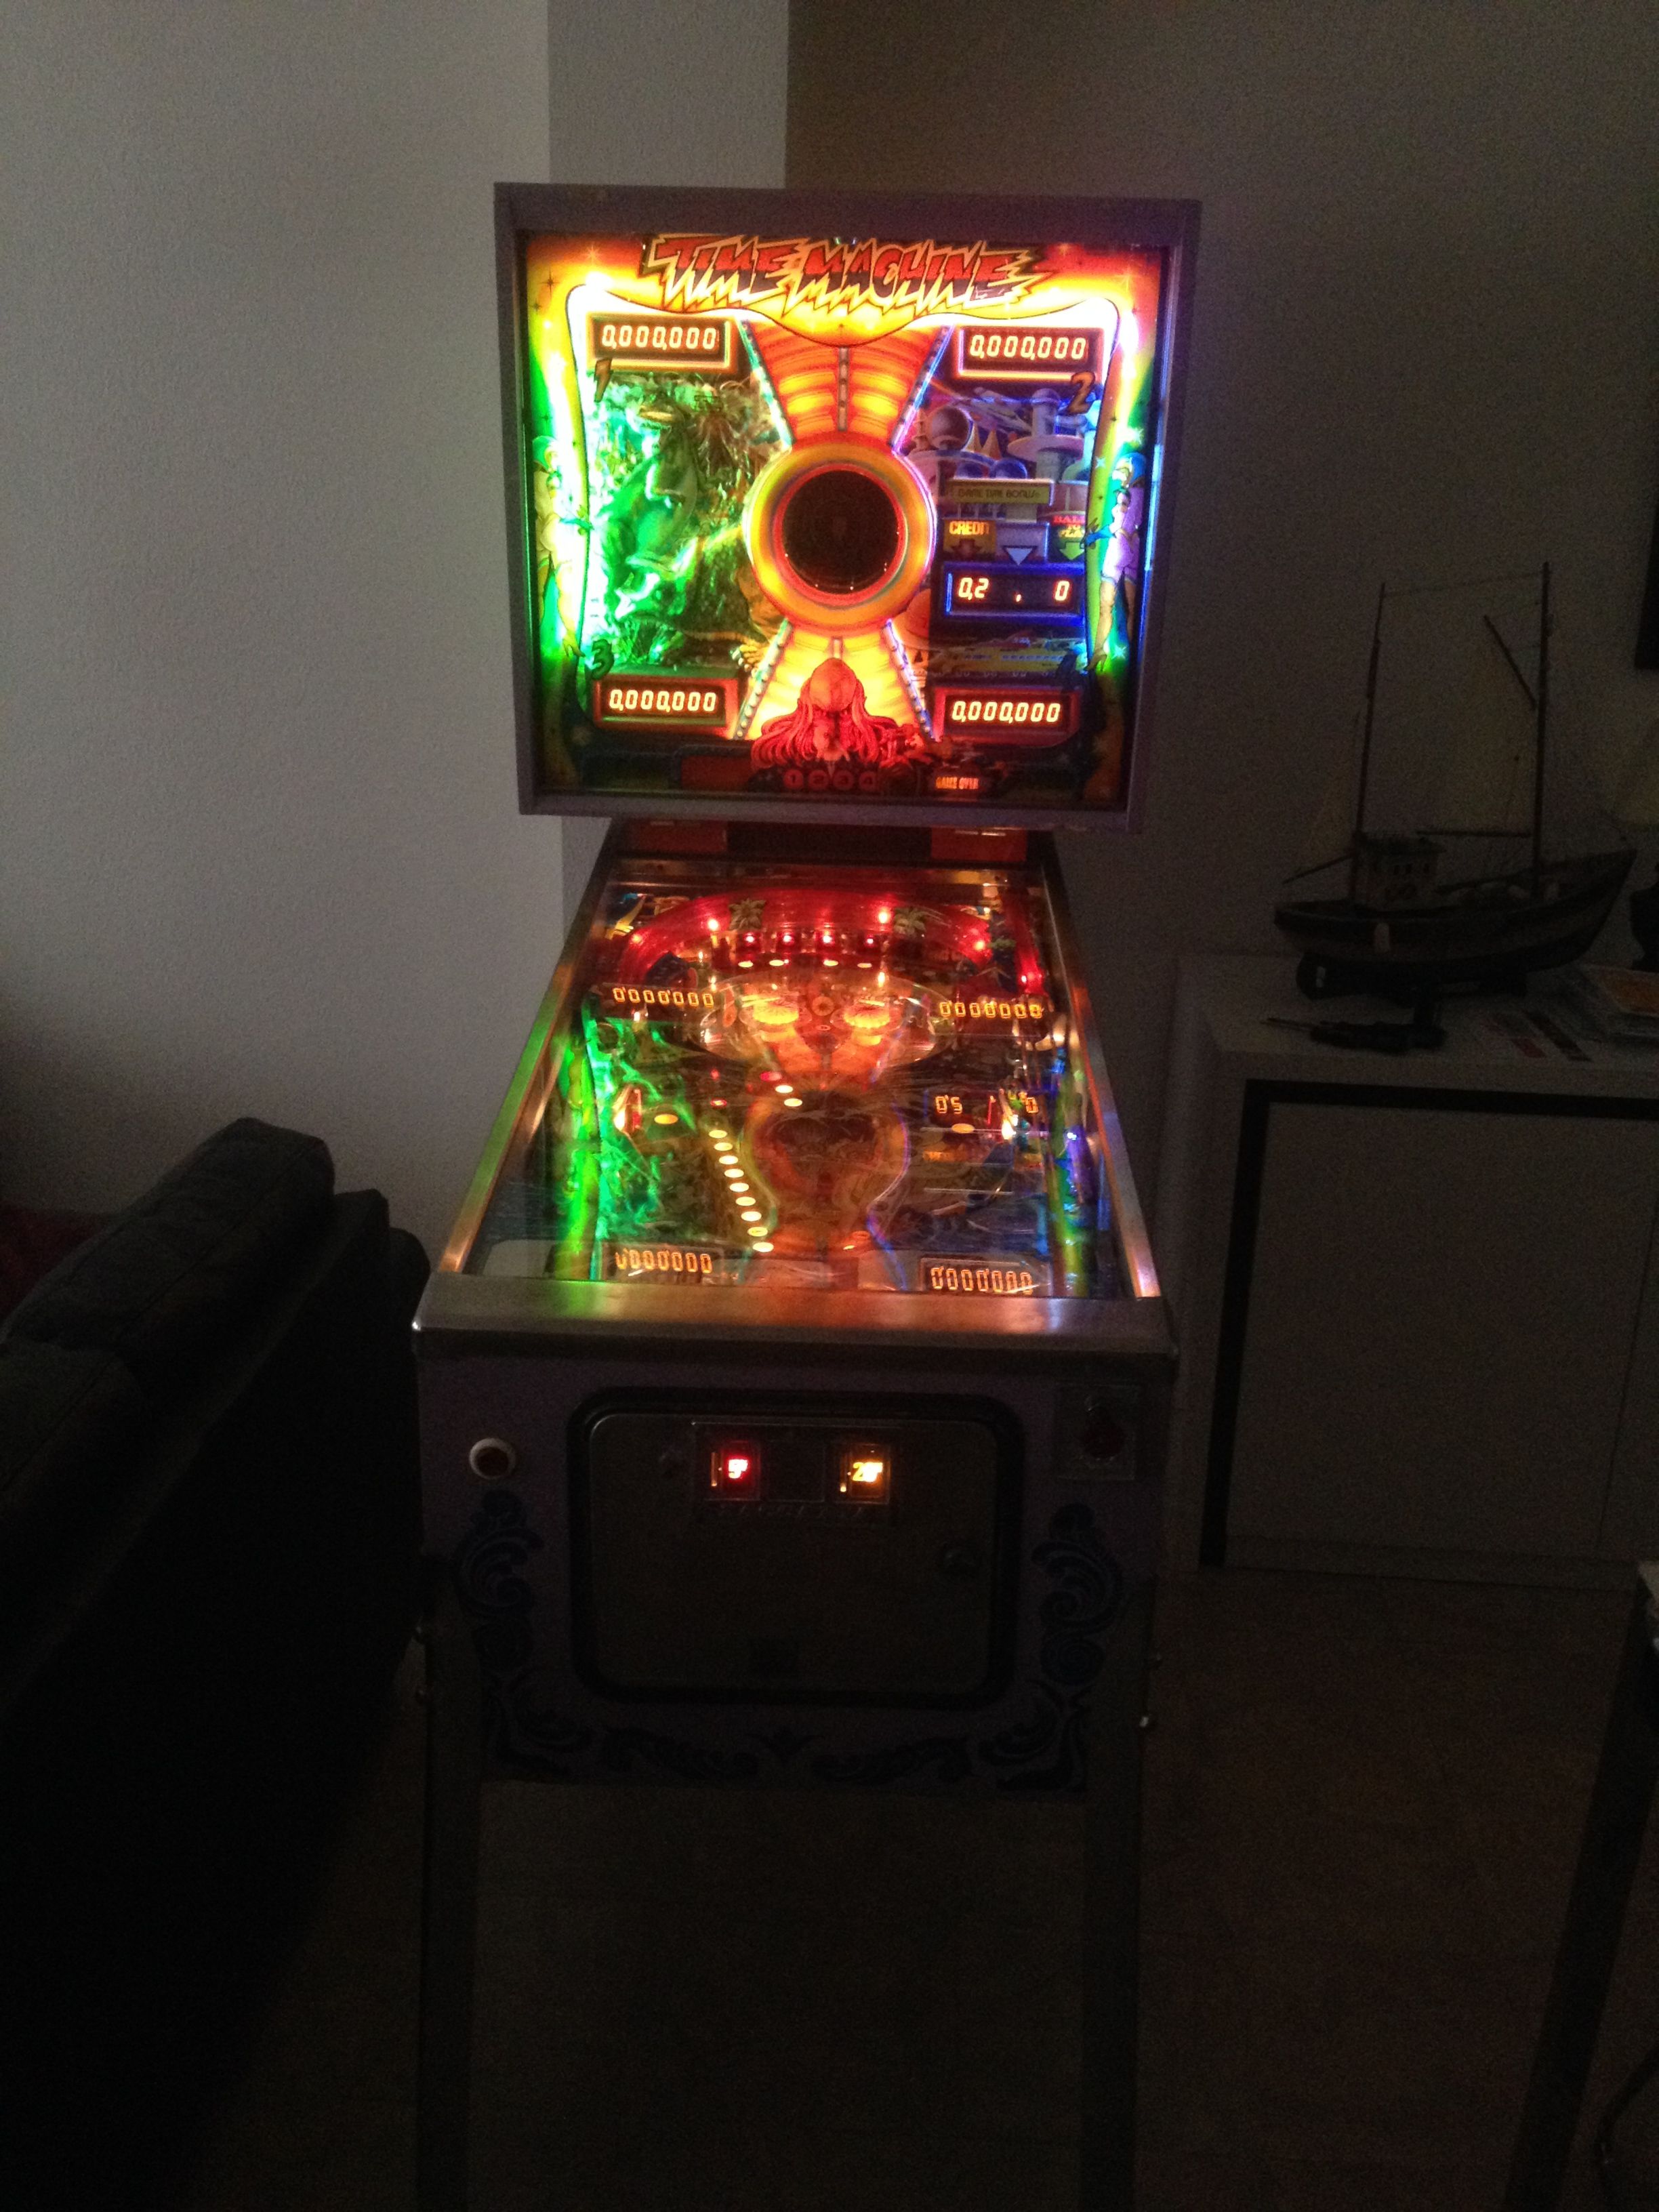
… with the Time Machine!
I can tell you it’s a very heavy machine if you have to carry it inside on your own (that’s why I took the backbox off before putting it in the car).
It’s a very nice machine with interesting game mechanics and it now has a proud place in my living room.
Now if I could only finish the work on the Pinball Champ displays and CPU board so I can start inviting friends for Zaccaria pinball parties.
Working on a replacement CPU board
Posted: 26 January 2014 Filed under: Electronics, General, Pinball Champ '82 | Tags: cpu, electronics, eprom, memory, zaccaria Leave a comment »
Well, here we go. I bought an old, untested CPU board on ebay quite a while ago. It clearly had some battery leakage problems that had been cleaned up by the previous owner, so now I need to fix the rest and get it up and running again.
Step 1: asses the damage.
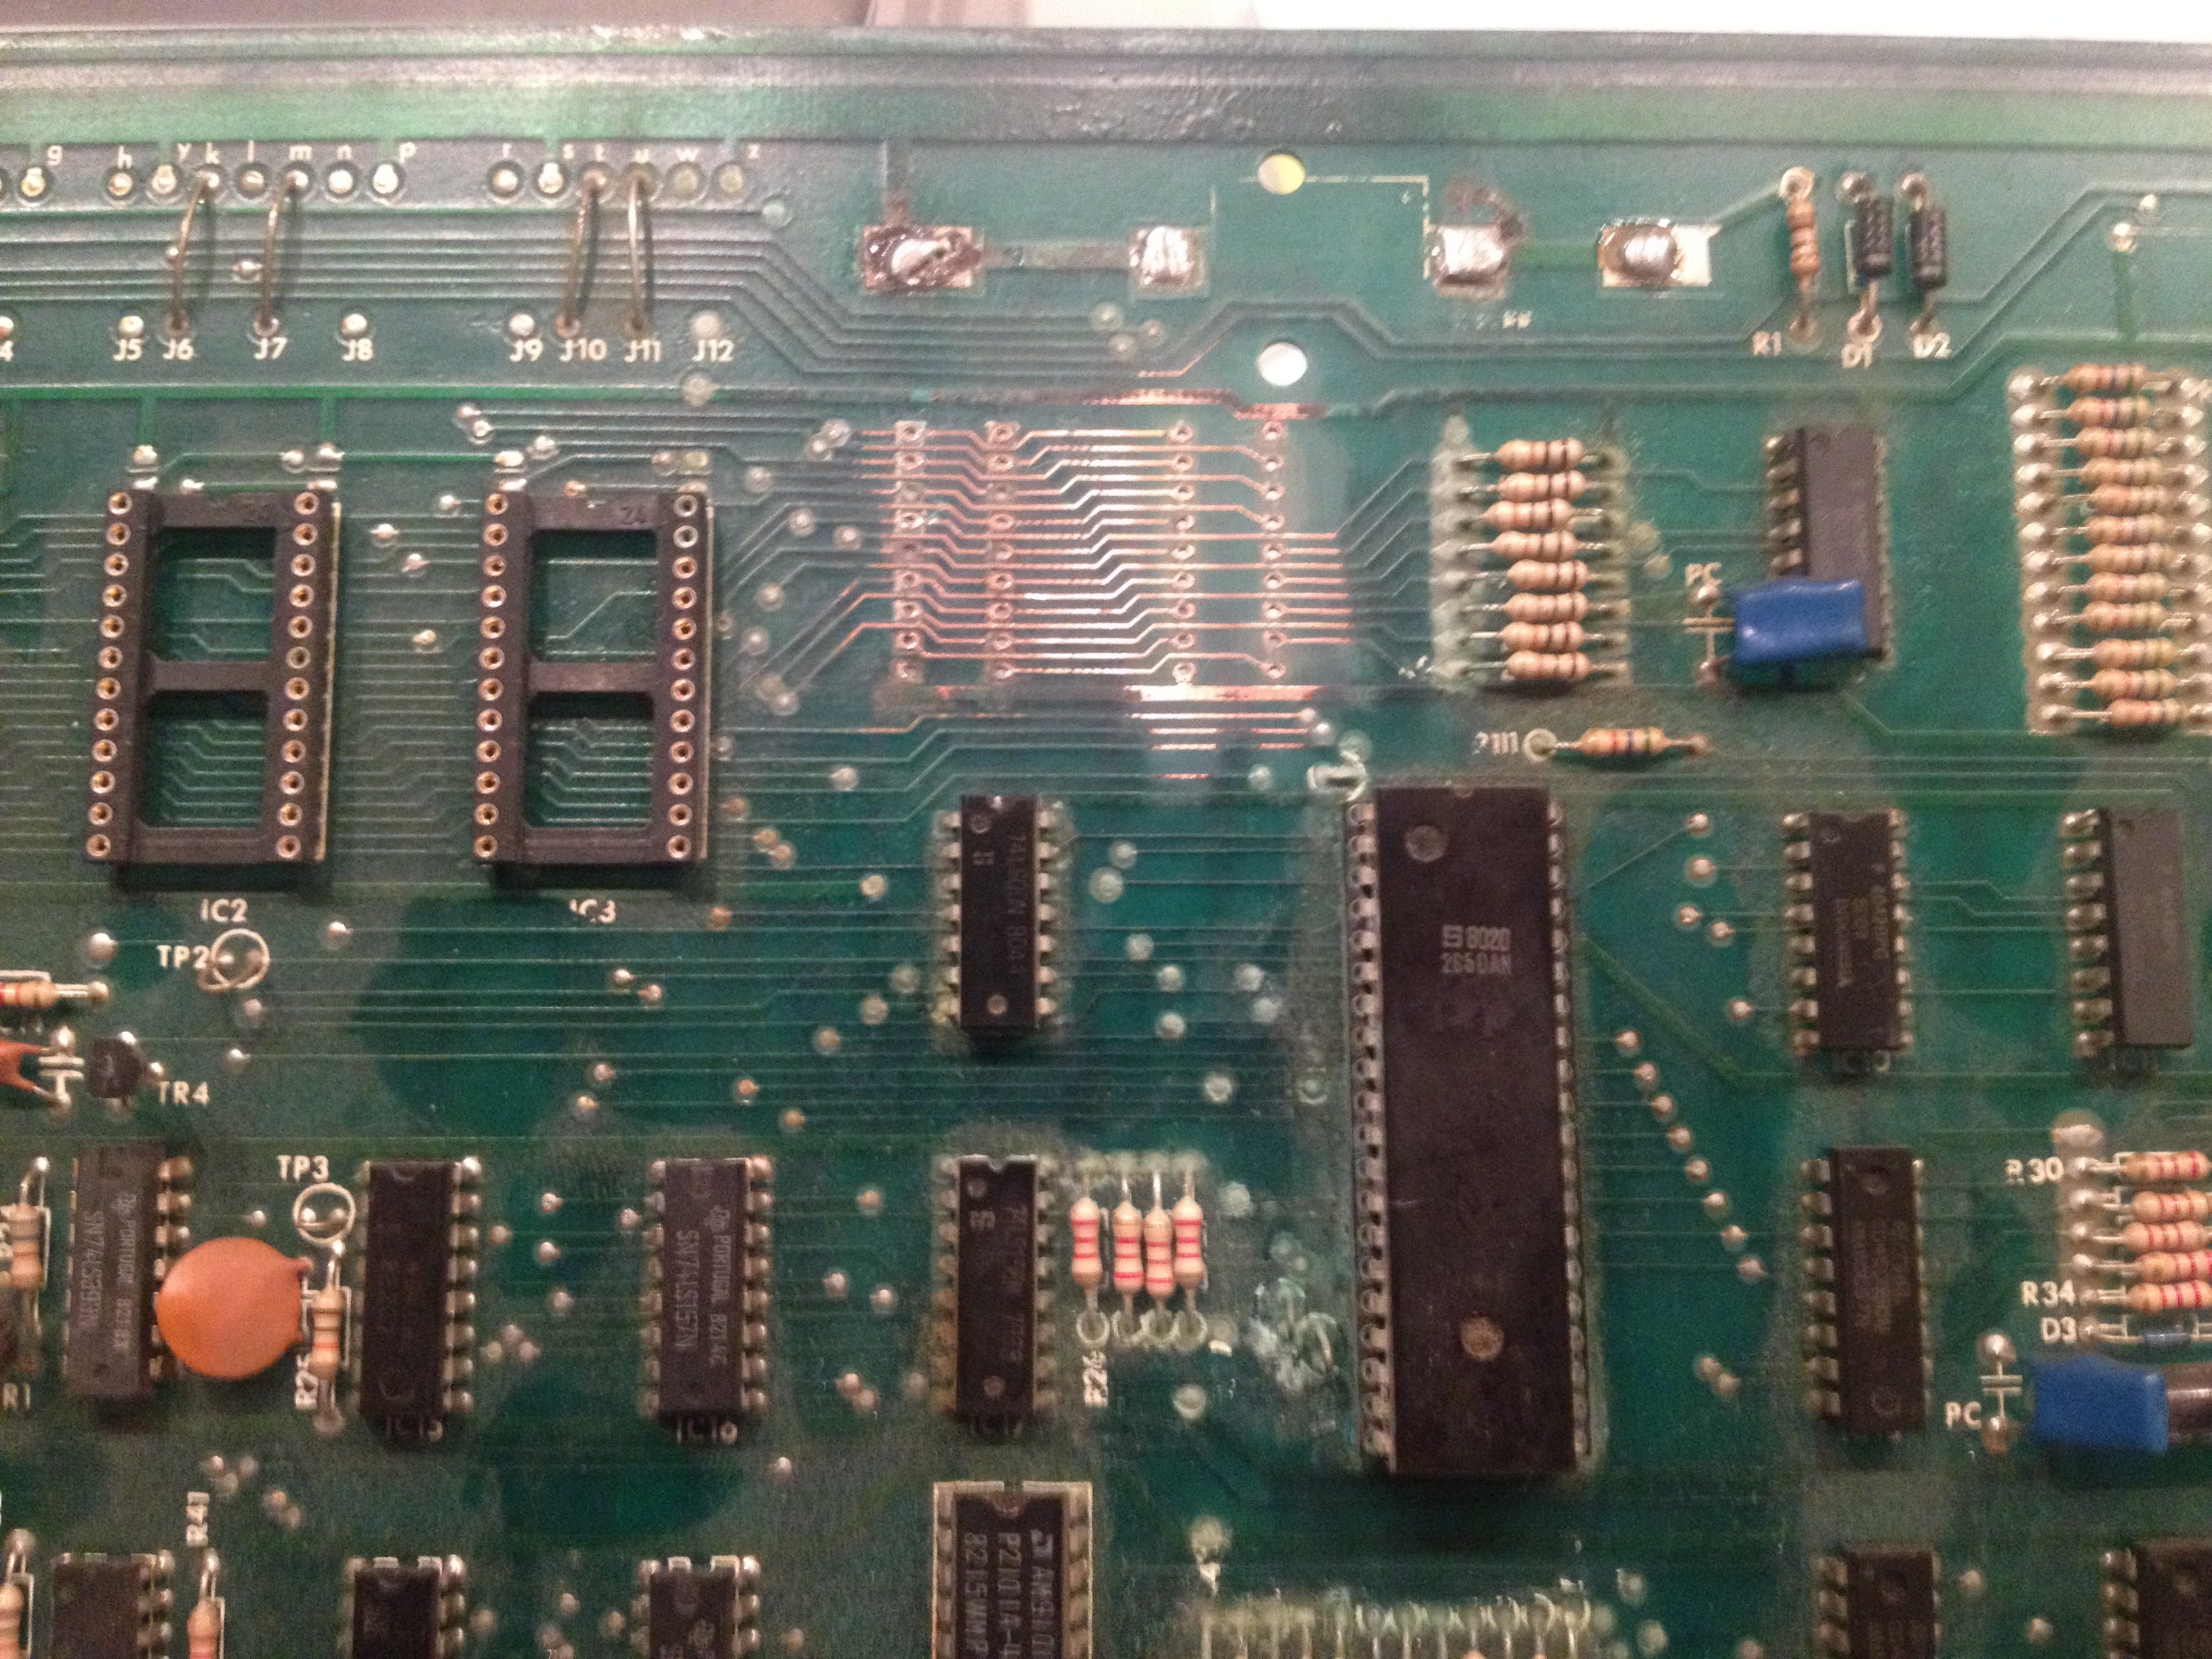
The CPU board when I received it
I noticed some of the copper was missing where the IC fittings used to be, so I first started with measuring the tracks that were still there. A lot of them are broken and not making the right connections. The breaks were too big to fix by covering them with a bit of solder on the component side of the PCB, so I will need to run wires on the solder side of the PCB. But first, I put in the missing IC fittings for the RAM chips.
Next I removed the 24-pin IC fittings for the three 2532 EPROMs. I replaced them with three 28-pin fittings so I can put in two 2764 EPROMs, which are needed to use David Gersic’s Freeplay ROMs and are much easier to come by. Using three fittings still gives me the option to put in the original 2532 EPROMs if needed. This also involves changing the jumpers just above the EPROM IC fittings.
As I am not going to reuse the IC fittings, I just cut them off.

Cutting away the old IC fittings.
The remaining “feet” were removed with a soldering iron. Once done, I just popped in the new 28-pin IC fittings and soldered them in place.

New fittings for the EPROMs and RAMs in place
All done.
Now I started measuring the connections on the new fittings and found that more than half were bad. This is going to be a lot of work. I’ve started wiring on the back side of the PCB, but time ran out, so I’m not finished yet. I have to redo connections between both RAM fittings and between the left RAM and right EPROM fittings. There was clearly a lot of damage from the battery leakage.

First two connections repaired, many to go…
I will keep you updated on my progress.
Upcoming projects
Posted: 7 January 2014 Filed under: Devil Riders, General, Pinball Champ '82 | Tags: cpu, display, driver board, electronics, pinball, zaccaria Leave a comment »
A new year, some new resolutions… Let’s get these machines finished.
The Pinball Champ’s displays are failing again, so I’m going to replace them with LEDs. The 7 segment displays are on order (estimated delivery 28 January), I have the PCB etching kit ready and I’m almost done with the PCB design (largely stolen from Leon).

Display PCB design
One of my pinball friends Eric exchanged my Pinball Champ backglass with a less damaged one. He only used his to hang on a wall in his gameroom and didn’t mind exchanging it for mine. One of the projects will be to fix the paint on the glass with some clear varnish. He also exchanged his Zaccaria etched playfield glass for my blank one, so now my Devil Riders also has an original playfield glass. Thanks again Eric!
Then finally I have scored myself a new 2nd generation CPU board. I’ve given up on the one I had for now, I might revisit it in the future, but it’s not very likely. The new CPU board has a bit of battery leakage damage around and under the memory chips that I need to fix. Hopefully I can get it to work 100% so I can put it in the Pinball Champ and get the Devil Riders’ CPU board back. Then I need to recheck all the electronics in the Devil Riders as my last CPU board test caused sparks on both the Power Supply and Driver board.
If all goes well both machines should be up and running by April 5th.
I’ll keep you posted.
Legs
Posted: 23 April 2012 Filed under: Devil Riders, General | Tags: chrome, cleaning, legs, pinball, zaccaria 2 Comments »
So now that I moved to my new place and I invited a bunch of friends over for a little house-warming, I found the need to get my pinball machines in my little game-room. The installation of the Pinball Champ was easy enough, but when I wanted to set up the Devil Riders I noticed that I hadn’t started on the legs yet.

- Legs before cleaning
So I quickly got out my metal sponge (the one you use after failed cooking experiments 😉 ) and got to work.

- Legs after cleaning
I got some new levelers and chrome leg bolts and now the Devil Riders is back on it’s feet again.
Devil Riders almost done
Posted: 27 March 2012 Filed under: Cabinet, Devil Riders, Mechanics, Playfield | Tags: apron, ball shooter, cleaning, coin door, door, metal parts, pinball, playfield, popbumper, zaccaria Leave a comment »
Well, it’s been a long time, but finally here’s a new post. I’ve moved house and my pinball projects have been on hold for months now. Anyway, here’s an update pre-move.
I got a replacement coil for the popbumper that had the wrong type installed, so I installed that first.

Correct bumper coil installed.
The I went to work on the ramp that I finally got back from the blacksmith. He charged me a lot of money for the repair, I guess he doesn’t want my “little” repairs anymore. To be fair, it was probably not difficult work, but it may have taken a while.

Back from the blacksmith. Not pretty, but functional.
So I cleaned it, installed it and finished the shooter lane and apron install.

Playfield done.
I’m waiting for new flipper bats and then the playfield will be done.
As I was in a cleaning mood, I disassembled the door and cleaned that too. Installed a new lock, etc.

The Devil Riders door before cleaning.

The Devil Riders door much shinyer, but still with an ugly hole in it...
It still has the ugly hole, but for now, I can live with that.
So next up are the legs and there is also a new shooter knob that needs to be ordered. After that, back to the bad CPU board. If any one has a spare, let me know!
The door to happiness
Posted: 19 December 2011 Filed under: Cabinet, Pinball Champ '82 | Tags: cleaning, coin door, pinball, zaccaria Leave a comment »
No, I’m not trying to sell you some guru meditation stuff. I just got my hands on a second hand coindoor for one of the machines and I’m happy with what I got at the price I got it!
The door was complete and in ok condition. Rather dirty, but then agian, why would that door be any different from the others.

A new door!
As you can see, someone had used paper stickers and electricians tape to cover the original plastic coin fronts. But otherwise, in very good shape.

Fully stocked
Except for the middle coin selector, everything is there. Dirty, but there.
First thing I did was take apart the front bezel and cleared away the paper stickers and electricians tape. Since there were three, I suspected they were the Deutsch Mark ones, like in the Pinball Champ. The Devil Riders has Belgian Frank ones and there are only two.

Uncovered and cleaned
To my surprise, these are Belgian Frank ones. With hindsight I should have known. The door is from a Time Machine and they came out when the 10 Fr piece was still in circulation. When Devil Riders came out, it wasn’t.

Cleaned and reassembled
The picture doesn’t do it justice. The chrome is damaged in two or three places, but it shines a lot. You can actually see my reflection in it.
At first my idea was to put this door in the Devil Riders, since some nitwit drilled a hole in the door to put a switch in to replace the outhole switch (I still get sick thinking of it). But then I decided to put it in the Pinball Champ. The frame looks a lot better and the door isn’t deformed, so it closes perfectly.
So after the usual dismantling, cleaning and reassembling, I installed it in the Pinball Champ and it looks great!

Installed and reproduction sticker attached
I added the reproduction sticker I got from David Gersic and now the Pinball Champ looks much better!
When the Devil Riders is finished, I’m going to set the coin selectors to 0.50 €, so if people really want to donate, they can.
In the mean time I also got that replacement coil for the popbumper in the Devil Riders and the part is back from the blacksmith waiting for reinstallation. That will be my next post.
Upper playfield reinstalled and head door done.
Posted: 11 December 2011 Filed under: Devil Riders, Playfield | Tags: cleaning, neon tube, pinball, playfield, zaccaria Leave a comment »
I finally got around to continuing the work on the Devil Riders. I finished the playfield as much as possible and disassembled the neon tube so I could get to the lamps in the backboard and clean everything up.

Playfield close-up

The left ramp

The upper playfield
I’ve reinstalled the old flipperbats as the new ones are on backorder. Once they arrive, they will be installed. Unfortunately, I couldn’t find yellow flipper rubbers that are the right size, so I had to use black ones. If anyone knows where I can find yellow ones, please let me know.
Also, that metal part that was broken is still at the blacksmith, so the ball shooter lane hasn’t been put in yet.
After that was done I started on the head door. I needed to get to the lights behind the plastic cover. For that I needed to remove the neon tube, but the rubbers isolating the connections are fused in place from 28 years of heating up and cooling down. I talked about it with Leon (flipper-pinball-fan) and David Gersic (Zaccaria-pinball) and they advised me to leave the rubbers and just undo the springs and put the neon on the playfield glass as carefully as possible.

Neon lamp disassembled, carefully...
Then I cut a slit on both sides of the plastic cover and took it off from around the neon tube leads. Worked like a charm and it’s impossible to see the slits now that the plastic cover is reinstalled.
When I checked out the neon more closely, I noticed some white spots on it. After close examination these where spots where the dirt had come loose… So I started cleaning the neon VERY carefully. The dirt, nicotine and tar didn’t come off very easily until I used one of those steel wool spunges used to clean cooking pots. The dust particles that came free from cleaning that way made me sneeze more than once.

Very dirty indeed.
I removed all the lightbulbs from the head door, tested them, cleaned and reinstalled the ones that still worked and replaced the faulty ones. The cover was cleaned too and reinstalled. Then I carefully put the neon back. The difference is huge, well worth the (little) effort and (considerable) risk.

Cleaned and reinstalled.
Next up is a trip to the blacksmith and the CPU board.
Posts and rubber rings
Posted: 23 November 2011 Filed under: Devil Riders, Playfield | Tags: pinball, playfield, zaccaria Leave a comment »
Well, after all the metal works, I’ve moved on to the posts and rubber rings. Very straight forward. Install the posts, put the rings around them, move to the next location.
On thing I noticed, this time, is that I didn’t take enough pictures… I should have been more thourough in documenting as I disassembled the playfield, like I was with the Pinball Champ.
I also cleaned the posts as I needed them and not all at once like the previous time. I don’t think I gained time or effort by doing it this way, but it did break the monotomy and made the whole thing much more pleasant.
Here’s how I’ve gotten on today:

Most posts and rubbers installed.
It’s starting to look like a pinball machine again! The only thing that is really going to be missing is the diverter that has the two broken off screw holes. I’m taking it to the blacksmith tomorrow to see if he can do something about that.

A little ways to go and the top half is done.
This is where most of the documentation was lacking; the top half… I’ve been looking at how many screws of what type are left and the holes in the plastics to see what goes where. So far so good. Should be able to get everything back together again tomorrow, except for the diverter and the shooter lane thingy.

The bottom half of the playfield waiting for plastics and touchup paint.
The bottom half of the playfield did have enough pictures, so that was a straightforward build. Just waiting for the plastics and the retouch around the reseated inserts.
This is going to be an even better machine when it’s done that the Pinball Champ! Can’t wait!
Metal parts
Posted: 22 November 2011 Filed under: Devil Riders, Mechanics, Playfield | Tags: apron, cleaning, metal parts, pinball, playfield, zaccaria Leave a comment »
Well, I’ve done most of the metal parts yesterday. I started off cleaning the two ramps and then polishing them using the chrome polish I use for my motor cycle. The result was two very shiny ramps!

The two ramps polished and reinstalled. Shiny!
Next up where the four metal guides that sit on the edge of the playfield. Bad news there, the chrome plating has started to peal off. I took away as much of it as I needed to so it won’t come loose while playing, but these parts will have to be stripped of all their chrome and rechromed at some point. I’ll wait until I have more so I can send off a whole batch of stuff at once and keep the cost down.

The chrome coating has come off of these guides.
Then I started the whole apron/outhole setup. Everything was in rather good shape, so it was just cleaning, polishing and reinstalling. I haven’t put the shooter lane back yet, since I still need to get a new diverter or fix the old one. So all in all I had a very fruitfull afternoon yesterday and this is the result:

Allmost all metal parts cleaned and reinstalled.
Bad day at the office
Posted: 16 November 2011 Filed under: Devil Riders, Mechanics, Playfield | Tags: outhole kicker, pinball, playfield, popbumper, zaccaria Leave a comment »
Well, everything started off promisingly enough. I had already cleaned the popbumpers, so all I had to do was reinstall them. Or so I thought.
I had bought new mylar trim platters to replace the dirty and desintegrated old ones, so I started with cutting to of them to size. They need to have a corner cut out to fit around some posts that are really close to the bumper. Then I started installing the first popbumper. The base plate first, then the switch and then the popbumper body with the new mylar trim. Not good…

The mylar trim plate doesn't sit right
You can clearly see that the trim is lifted up about half a centimeter. Now way that’s right… So I dismantled the body again and had a close look at it all.

The holes for the baseplate rod guides are to small
So the holes in the trim are too small. I should have noticed that earlier. I checked on the website of the place where I had bought them but since they only had one-size-fits-all, there’s nothing much I can do. So happy I just bought a new multi=tool!

Leeloo Dallas multi-tool 😀
So with a bit of finesse I managed to widen the hole and now the trim fits perfectly.

Fits like a charm
Rince and repeate three times and finally the popbumpers are installed.

All popbumpers finally reseated.
That took a lot longer than expected and since I only had about 20 minutes left before I had to go, I thought to quickly install the new outhole switch. I soldered a diode over the appropriate contacts and went to get the bracket to fix it to the bottom of the playfield.
The bracket was no where to be found! Where did I put it. Where could it be. Then I remembered that I checked the bracket on the playfield to see which were the correct holes last time I worked it and I might have left it there when I left. And today while turning the playfield over to get tot the popbumpers it might have fallen off. After 5 minutes of sitting on my knees, clearing out my toolbox bit by bit, I still hadn’t found it. Finally I noticed something weird with one of the flipper assemblies, there was a piece of metal sticking out that shouldn’t be there. Sure enough it was the bracket that got lodged between the playfield and the flipper assembly. I had found it!
So I started screwing it in place only to notice one of the screws and bolts for the microswitch itself was missing. Where was it? Still on the old switch! So into the trashcan I went. Luckily I hadn’t emptied the trash yet, so it was still in there and I could recuperate the screw and bolt. With the new switch finally installed I soldered the leads to it and now the bottom part of the playfield is done.

New outhole switch finally installed
So with all that bad luck and stupid mistakes, an hours worth of work took me over three hours to do. Bad day at the office indeed!
 Videolan.org – The home of VLC